Github搭建个人博客
github搭建个人博客
- 以下操作全在 Mac OS上
1、首先要配置环境
- 用到的软件有
- Node.js
- Git
- 下载地址
- Node.js https://nodejs.org/en/
- Git http://git-scm.com/download/
- 安装没有什么难度,安装完毕,可在终端里看到各个软件的版本信息
song$ git --version
   git version 2.3.8 (Apple Git-58)
song$ node -v v0.12.4
2、配置hexo
创建、生成以及部署博客就靠这个了。
2.1、安装
sudo npm install -g hexo- 这里坑很多,很可能因为缺少各种软件依赖而无法安装成功,一定要用sudo方式安装 - 如果安装失败,可以更换下软件源试试
npm config set registry="http://registry.cnpmjs.org"
- 这里坑很多,很可能因为缺少各种软件依赖而无法安装成功,一定要用sudo方式安装 - 如果安装失败,可以更换下软件源试试
2.2、如果安装成功输入
hexo -v可得出如下结果song$ hexo -v
hexo: 3.1.1
os: Darwin 14.5.0 darwin x64
http_parser: 2.3
node: 0.12.4
v8: 3.28.71.19
uv: 1.5.0
zlib: 1.2.8
modules: 14
openssl: 1.0.1m
3、使用过程
3.1、创建一个保存本地文件的文件夹
mkdir blog
3.2、然后进入文件夹,初始化hexo,生成一些基本配置文件
hexo initsong$ hexo init
INFO Copying data to ~/Desktop/test/blog
INFO You are almost done! Don't forget to run 'npm install' before you start blogging with Hexo!
3.3、安装依赖包,这个必须安装,而且必须使用sudo方式,不然又是一大堆错误
sudo npm install然后会安装一大堆依赖包
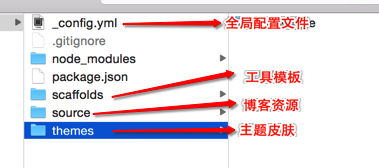
3.4、创建完成后可以查看文件目录
3.5、配置文件
网站设置,配置主目录下的_config.yml文件,暂时只修改
Site下面的配置,其他的选择默认。# Hexo Configuration
## Docs: http://hexo.io/docs/configuration.html
## Source: https://github.com/hexojs/hexo/
# Site
title: blog #博客名称
subtitle: # 子标题
description: # 描述
author: Mr Song # 作者
language: zh-CN # 语言,中国就是zh-CN了
timezone: # 时区,默认就好
# URL
## If your site is put in a subdirectory, set url as 'http://yoursite.com/child' and root as '/child/'
url: http://yoursite.com
root: /
permalink: :year/:month/:day/:title/
permalink_defaults:
# Directory
source_dir: source
public_dir: public
tag_dir: tags
archive_dir: archives
category_dir: categories
code_dir: downloads/code
i18n_dir: :lang
skip_render:
# Writing
new_post_name: :title.md # File name of new posts
default_layout: post
titlecase: false # Transform title into titlecase
external_link: true # Open external links in new tab
filename_case: 0
render_drafts: false
post_asset_folder: false
relative_link: false
future: true
highlight:
enable: true
line_number: true
auto_detect: true
tab_replace:
# Category & Tag
default_category: uncategorized
category_map:
tag_map:
# Date / Time format
## Hexo uses Moment.js to parse and display date
## You can customize the date format as defined in
## http://momentjs.com/docs/#/displaying/format/
date_format: YYYY-MM-DD
time_format: HH:mm:ss
# Pagination
## Set per_page to 0 to disable pagination
per_page: 10
pagination_dir: page
# Extensions
## Plugins: http://hexo.io/plugins/
## Themes: http://hexo.io/themes/
theme: landscape
# Deployment
## Docs: http://hexo.io/docs/deployment.html
deploy:
type:
Hexo主题设置
- 需要什么主题可以在这里进行 https://github.com/hexojs/hexo/wiki/Themes
- 这个主题也不错,不用自己设置代码高亮了 http://wuchong.me/jacman/
- 比如说这个 https://github.com/moretwo/hexo-theme
- 进入主题目录后通过命令
git clone https://github.com/moretwo/hexo-theme.git进行下载 然后回到根目录更改主题
Extensions# Extensions
## Plugins: http://hexo.io/plugins/
## Themes: http://hexo.io/themes/
theme: aiki
3.6、生成静态网站
使用命令
hexo g(hexo generate)song$ hexo g
INFO Files loaded in 574 ms
INFO Generated: asset/img/logo.png
INFO Generated: asset/img/favicon.png
INFO Generated: asset/css/style.css
INFO Generated: 2013/01/05/hello-world/index.html
INFO Generated: archives/index.html
INFO Generated: archives/2015/index.html
INFO Generated: archives/2015/09/index.html
INFO Generated: index.html
INFO 8 files generated in 332 ms
3.7、开启本地服务
hexo s(hexo server)打开浏览器进行网页预览
song$ hexo s
INFO  Hexo is running at http://0.0.0.0:4000/. Press Ctrl+C to stop.
3.8、部署到github
hexo d(hexo deploy)部署到github,这个需要提前在github完成相关配置,下面详说
图片上传问题
资源文件夹
- 资源(Asset)代表 source 文件夹中除了文章以外的所有文件,例如图片、CSS、JS 文件等。比方说,如果你的Hexo项目中只有少量图片,那最简单的方法就是将它们放在 source/images 文件夹中。然后通过类似于
 的方法访问它们。
文章资源文件夹
对于那些想要更有规律地提供图片和其他资源以及想要将他们的资源分布在各个文章上的人来说,Hexo也提供了更组织化的方式来管理资源。这个稍微有些复杂但是管理资源非常方便的功能可以通过将 config.yml 文件中的 post_asset_folder 选项设为 true 来打开。
_config.yml
post_asset_folder: true
当资源文件管理功能打开后,Hexo将会在你每一次通过 hexo new [layout]
命令创建新文章时自动创建一个文件夹。这个资源文件夹将会有与这个 markdown 文件一样的名字。将所有与你的文章有关的资源放在这个关联文件夹中之后,你可以通过相对路径来引用它们,这样你就得到了一个更简单而且方便得多的工作流。
相对路径引用的标签插件
通过常规的 markdown 语法和相对路径来引用图片和其它资源可能会导致它们在存档页或者主页上显示不正确。在Hexo 2时代,社区创建了很多插件来解决这个问题。但是,随着Hexo 3 的发布,许多新的标签插件被加入到了核心代码中。这使得你可以更简单地在文章中引用你的资源。
{% asset_path slug %}
{% asset_img slug [title] %}
{% asset_link slug [title] %}
比如说:当你打开文章资源文件夹功能后,你把一个 example.jpg 图片放在了你的资源文件夹中,如果通过使用相对路径的常规 markdown 语法
 ,它将 不会 出现在首页上。(但是它会在文章中按你期待的方式工作)
正确的引用图片方式是使用下列的标签插件而不是 markdown :
- 通过这种方式,图片将会同时出现在文章和主页以及归档页中。
4、部署到github
整体步骤
- 1、首先注册一个『GitHub』帐号,已有的默认默认请忽略
- 2、建立与你用户名对应的仓库,仓库名必须为『your_user_name.github.com』
- 3、添加SSH公钥到『Account settings -> SSH Keys -> Add SSH Key』
生成SHH-Key
- 1、首先设置你的用户名密码:
git config --global user.email "你的邮箱"git config --global user.name "你的用户名"
- 2、然后生成秘钥
ssh-keygen -t rsa -C "你的邮箱"
- 3、打开pub文件,赋值所有内容,然后在github中添加ssh-key
- 4、测试是否成功
ssh -T git@github.com
